Entries in the 'Jobs' Category

Multi-Cultural Day Poster

Assignment and Contest

It’s not too often that you get an assignment that has the potential to earn you PRIZE MONEY!

Check out the link to the Multicultural Day 2012 Poster. This PDF has all the specifications and a contest entry form.

This assignment is due Nov. 9th.

Contest deadline,  Nov. 10th.

Guest speakers – Los Hermanos Rodriguez

Ignacio and Zoro Rodriguez, of Dos Gallos

Moorpark College alumni, Ignacio and Zoro Rodriguez, will present their design portfolio in the Visual Technologies class at 6pm. tonight, 10-12-11, in Com 109. The brothers have a broad range of experience in the freelance design business. They have published books and have been involved designing for Walt Disney Corporation and are active in the fashion industry. They have also participated triathlons to raise money for charity.

What is Graphic Design?

I typically pose this question at the beginning of every GRM23 class, and I’m usually met by a classroom of blank stares.

John McWade recently posed this question in his online magazine, Before and After, with some interesting responses.

Start Page One Anywhere

So you have a 12-page document in InDesign. Page one is the cover, page two, the inside cover. You want to start the page numbering on the third page, but you want the page numbering to begin at one, not three? And you don’t want to create the covers as a separate document.

This one stumped me for years but thanks to Kevin in the GR23 class we now have a solution.

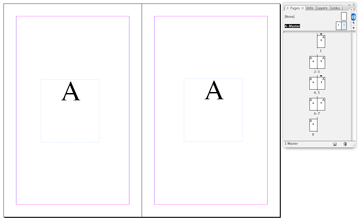
Set up your multi-page document and create automatic page numbering on the master pages.

If you want the page numbering to begin on the third page, go there and in the page palette, Override All Master Page Items. This unlocks the numbering so that changes can be made. You will notice that the faint dashed line that surrounds the text frame has reverted back to a solid line.

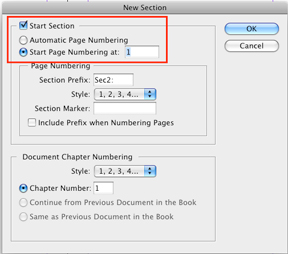
Next, go to Layout>Numbering & Section Options to bring up the New Section Dialog and set it up as in the example below and click OK. Now the third page should display the number “one.” The front cover still displays a “one,” and the second page, a “two,” but the third page begins again with number “one.”

You can delete the page numbers off the cover or any other page where it is not desirable to display page numbering by navigating to the page, overriding master page items and then deleting. Or, if you prefer, you can go to page two, for example, and in the New Section Dialog, you can change the style of the Section numbering to Roman numerals, or any of the other four ways of displaying page numbering.

Calendar Grid with Sliding Numbers

Creating a calendar from scratch and setting up the dates for each month can be tedious and frustrating, but it doesn’t have to be. The following method works equally well in Adobe Illustrator or Adobe InDesign.

Begin by creating a paragraph with 14 tab stops using an alignment of your choice. Use these paragraph settings to create a grid of numbers which you’ll duplicate and use on each of the subsequent months. The size of type and amount of leading in your number grid depends on the overall size of the squares used for each day.

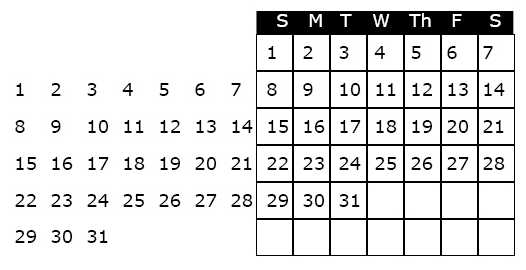
For the first line in the number grid, press the “tab key” seven times to move the cursor to the correct position to begin numbering. Set up a grid of numbers as shown below.

The next step is to create a an actual grid, or table to “hold” the numbers and daily information. To create the grid, use the table tool, or create a square that is the same width as your tab set, and depth equal to the leading. Use the “step and repeat” feature to duplicate the squares, and label the days of the week at the top of the grid. When the grid is completed it should look like the illustration below.

To use the calendar in a document, highlight the unused dates and make the type the same color as the background (usually white, i.e., no ink printed, so that one can write in the grid).

To create the calendar for the next month, highlight the number grid with the arrow tool, slide it into the appropriate position and white out the unused numbers.

Hope this technique saves you some time and frustration!

Tables Simplify Complex Formatting Tasks

Reading: Bible p.547-569 – Setting up Tabs and Tables

While InDesign allows for the most complex of formatting jobs, it supplies a number of tools to ease the tedium and redundancy where formatting text is concerned. When dealing with large quantities of data, such as the information for a price list or catalog, Tables can pick up where Paragrarph Styles, Tab and Paragraph Rules leave off.

First, consider the data flow. The initial data can originate from a number of sources. It may come from Microsoft Word, Excel, or it can come right off the internet. If you are getting the data from a website, ask the provider to export the data to an Excel file. Once you have the Excel file, you can open it and determine if any fields can be eliminated, as it is easier to edit the data before importing into InDesign.

Creating the Initial Table

With the data finally prepared, go to File>Place, importing the Excel file into InDesign. When placing, be sure to check “Show Import Options.”

In the “Show Import Options” dialog, at the top of the dialog you’ll see, “Sheet.” Here, you need to choose the specific worksheet associated with the Excel file.

Formatting: Table > Unformatted tabbed text. By choosing this option, you will be able to control all aspects of formatting the table in InDesign.

With an active text cursor within the table, Select>All and go to the Table Menu>Convert Text to Table. The Column separator can remain set at Tab, and the Row Separator at Paragraph.

Apply Design Styles to the Table

Once your text is converted to a table, it is similar to an inline graphic in that it resides within a text frame. However, to make changes to the table or its contents, use the text tool. With an active cursor in the table, you can edit the column or row size by moving the cursor directly over the line. When it turns to a double-headed arrow, click and drag to change the size. Edit the column widths appropriately so that the rows fit comfortably on a line.

Drag with the text cursor to highlight text in a cell. To highlight all the text in the table, first highlight a row, then go to Edit>Select All to change the font, style and size. Incorporate paragraph styles and a complex task is eased.

The Table>Table Options gives information about the table, and control over the spacing, strokes and fills for columns and rows in the table for graphic customization.

Production Made Quick and Easy

No matter what type of publication you’re working on: newsletter, magazine, brochure, catalog, greeting card, etc., once the design problems are resolved, the rest is mostly production work. Because production work tends to have repetitive procedures, there are a whole slew of “tricks” that can speed the process up and take the tedium out of the work.

The Page Palette

  1. Duplicate a page with all of its elements, including guides – Click on the page in the page palette, hold down the option key and drag it below the existing page. Voila, a twin!
  2. To edit and remove master elements from a page in the publication – Click on the page palette pop up menu>Override All Master Page Items. They are no unlocked and free to move about the cabin.
  3. In the same palette, you can steal master pages from other documents by first saving, then loading master pages.
  4. For that matter clone a page from a different file by dragging its page icon from one file to the other.

Step and Repeat

  1. One of my favorite and one of the more useful features for production is Step and Repeat found under the Edit Menu. Use it to duplicate and position elements with a single operation.

Assign Color to Line Art

  1. In photoshop, convert your line art to Bitmap. If you scanned it in RGB, you’ll need to convert the file to grayscale before converting it to Bitmap. In the conversion dialog, choose 50% threshold, which converts all pixels under 50% gray to white, and those greater than 50% to black.
  2. Place the bitmap file into InDesign.
  3. Select the content of the frame with the Direct Select (white) arrow tool and the “fill” swatch active.
  4. Choose a color from the swatches palette to convert the contents to the desired color.
  5. To fill the background with a color, use the Black Selection arrow tool.

Graphic Arts Internship

Hello Graphic Arts People!

I have recieved an announcement for non-paid and paid interships at the Santa Monica Mountains National Recreation Area. I work with Ranger Sheila (pronounce SHY-la) Braden with biology interns and their experience is invaulable.

If you have some special students please refer them to Sheila Braden. They can also download an application online (if they google NPS Santa Monica Mountians).

Potential interns can contact Audry Furrel for college credit.

Please spread the word.

Thank you!

Kath Courtney

Help Wanted

Looking for a reliable worker. Work requires using vector base software. Creating graphics for use in decals, T shirts and Hats. Printing heat transfers and applying them to T shirts and Hats. Training will be provided, prior knowledge and understanding of Illustrator is a plus.
Company name: Topanga Customs, Contact name: Haig. 818-716-5622 email: topangacustoms@hotmail.com

Help Wanted

Looking for a reliable worker. Work requires using vector base software. Creating graphics for use in decals, T shirts and Hats. Printing heat transfers and applying them to T shirts and Hats. Training will be provided, prior knowledge and understanding of Illustrator is a plus.
Company name: Topanga Customs, contact name: Haig. 818-716-5622 email: topangacustoms@hotmail.com