Entries in the '' Category

Retouch and colorize old photos

The name of the file that you will be retouching is fancylady.jpg , which will be distributed during class.

By completing this project, students should gain a basic understanding of the following tools and techniques used to repair, restore, and colorize old and damaged photographs:

  1. Crop and rotate
  2. Histogram and levels
  3. Rubber Stamp – cloning
  4. Channels
  5. Selection techniques, including Quick Mask
  6. Color modes
  7. DUE: Feb. 19
    Send your jpgs, as usual, by email. Submit two prints  — the original, and the completed retouched and colorized image in your folder. Present at the beginning of the period.

    Bring in an old photo from home, retouch and submit it along with the “fancy lady” for full credit on this assignment.

Deadlines for Spheres

Part 1 & 2 – Thursday Jan. 29th.

Part 3 – Thursday Feb. 5th.

Sphere Exercise

How to submit the exercise:

  1. Your initial sphere was created in Photoshop with a resolution of 72 dpi. For each version of the sphere (grayscale, RGB color bands, sphere in action) create a jpg (save for web and devices), attach to email and send to instructor
  2. For each version of the sphere (grayscale, RGB color bands, sphere in action), print and bind in folder
  3. Create a new file at 300 dpi, and repeat the sphere exercise in grayscale, print and bind in folder
  4. Analyze the 72 and 300 dpi prints, compare and comment in writing in your folder

Reporting Attendance

I’ve located the missing emails, and have received assignments from many of you but not all.  If I have not responded to any of your emails, see me to make sure that I get them going forward. I have asked several of you to do more work on the Obama illustration, and you may need more help to accomplish this. We will be re-visiting this assignment within the next couple of weeks in class. Soon I’ll post instructions but want to wait until I have CS4 so you’ll recognize the images. The project due date will be most likely be around midterm.

In the meantime, I suggest you start bringing digital photos to class. All who have cameras, bring them to class…and don’t forget the cable to download the images to the computer. Remember, when you send your attendance, I want a new and different image each week. This can be done during your lab time, or you can work on them at home if you prefer.

Photoshop Layer Basics

The purpose of these two exercises is to give students a understanding of how raster images and their layers behave.

Making Selections – In-class exercise

Spheres – In-class exercise – due jan. 29 by the beginning of class.

  • Beginning Layers
  • Marquee Selections
  • Simple Gradients
  • Modifying the edge of a selection

HOMEWORK:

Attach Image with Your Attendance

We begin the process of learning how to capture images and manipulate them in Photoshop. Discussion and hands-on exercises explore:

  • Digital cameras
  • Photoshop’s work environment
  • Color Modes/Models
  • Resolution – ppi, dpi, lpi
  • Masks & Simple Selections
  • Tools & Palettes
  • Brushes
  • Color Picker
  • Introduction to layers
  • Printing from Photoshop overview
  • The Journal

Using techniques reviewed in this week’s class, create a self-portrait and attach it to your email attendance. You will be creating a “quick” self-portrait for each class session. By the end of the semester you will have enough images to “fill a book.” Each of these “sketches” should be quick, taking only 10-15-minutes or less. Don’t overthink them. Use them to experiment. Later, if you want to go back to an image and spend additional time on your sketches, you may. The sketches will serve multiple purposes throughout the semester, so it is important that you participate…it is part of your attendance grade.

  1. The sketches demonstrate that you participated in classroom exercises and activities.
  2. The sketches, being self-portrait in nature, and using techniques covered in the classroom, give you the opportunity to practice what you are learning.
  3. The sketches help to identify your email in a unique and personal manner.
  4. You will use these sketches as part of your library of images.
  5. Print a copy of your sketch and paste or tape into your journal.

ROBIN WILLIAMS ON DESIGN

ANDREW MUNDI ON DESIGN

The Folder

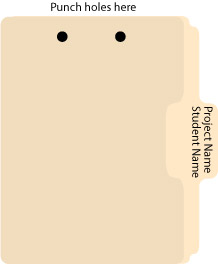
Every assignment must be kept in a 3- or 5 tab manilla folder. The name of the assignment should be written on the tab, along with your first and last name. The folders should be punched with a special two-hole punch, which is kept in the Com151 classroom. (It wanders and the computers are black like the punch, so we may have to be on the lookout.) You’ll need to purchase the steel fastener bases to attach the paperwork generated for each assignment. And you thought with computers, we’d print less?

To assemble, the tab should be on the right with the holes punched on top.  For our first few projects you will generate a project sheet by printing the blog entry describing the project.

folder front

TIP: Label all printouts with their corresponding electronic file name

open folder with contents

Punch and attach the finished project sheet on the left. As you work on a project, you should be keeping track of the time you spend on each facet of the job. It is likely that you will need more than one work session to complete a project, so make sure you keep track of all time spent.

The right side of the folder is for all of the “paper” you generate over the course of the project. These procedures will help organize the workflow on any given project.

Folders and electronic files for all of your projects should be brought to all class sessions. They should be available at all times so that the instructor can advise you on your work habits and give you feedback on your design work. The folders allow the instructor to determine a your progress and spot areas of strength and weakness.

Most important, the folders are a tangible record of the project and the communication between student and instructor that illustrates the steps toward completion.

Why Design?

To design is much more than simply to assemble, or even to edit; it is to add value and meaning, to illuminate, to simplify, to clarify, to modify, to dignify, to dramatize, to persuade, and perhaps even to amuse.

Paul Rand

  • Introduction to the Adobe Creative Suite
  • What is Graphic Design? Computer Graphics?
  • Careers?

Homework
Assigned Reading – Layout Workbook, Kristin Cullen, pages 1-51
Reading – Notes Online, Introduction, Chapter 1 & Chapter 2
Exercise 1 Simple Masks – in class exercise

A graphic designer is an expert in the manipulation of type and image as a means to order information, present ideas, and sell messages. This will not change in the year 2000. What will change, however, are the tools, environments, and languages of design. Style will also shift, but style is the covering not the content. Design is a vehicle for conveying content.

Steven Heller, author of The Education of a Graphic Designer

Must-see video, blast from the past

Make sure your sound is on. Enjoy.

Shopping from home in 1999

Apple’s Knowledge Navigator