Recap of the ‘Fancy Lady’ exercise
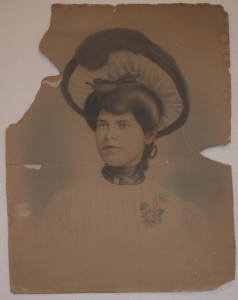
Let’s take a look at the original image as photographed. The original measured about 18×24 inches and was photographed with a Canon Digital Rebel. The client’s objective is to restore the image to match original as closely as possible.

fancy lady before
It’s important to analyze the image before deciding how and where to begin. Is this a photograph, a drawing, or both? My impression was that it was very photographic in look and feel, but but definitely hand drawn, possibly from a projected image.
The substrate is a multiple ply, non archival material, discolored from the paper’s acid content. The only distinguishing mark in the background is the soft blue halo behind the lady. Rather than repair the background, a decision is made to replace it with a brand new digital background that imitates the airbrushed halo in the orignal.
The hat requires repair.
The tear that runs across the neck and chin need repair.
The lady’s dress should be distinct and separate from the background.

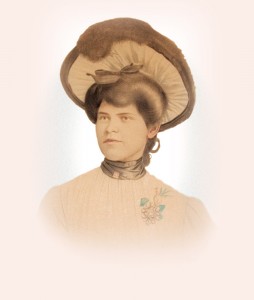
Fancy Lady After
Here is an example of the repaired image.
As you look at it, study each element and decide how you would build the image, layer by layer.
From the bottom up, we have the background color layer, the blue halo layer and the lady layer.
As you repeat/complete this exercise, keep the following in mind:
- make accurate selections
- pay attention to selection edges
- remember to deselect when appropriate
- save a selection for later (select menu)
- levels applied with an adjustment layer affects all layers below
- merge selected layers if necessary
- pay attention to what layer you’re on and the order of your layers
I am frequently asked why I choose one technique over another, or perform one action before another, instead of after.
Sometimes I have a very logical, reasonable reason for doing things in a particular order, but frequently there is no real right or wrong way. There are a myriad of ways. For each problem presented in restoring this image there are dozens of solutions. As designers we are challenged to come up with a creative solution and execute the design within the constraints of time and budget.
Each image presents its own set of unique challenges, and restoring photos can consist of lots of missteps. The path to restoring a photo is not always the straight road that we went down in today’s class. Try starting over to see if you can repeat what we did in class. Take it one step at a time, one layer at a time. Give your layers a logical name so you don’t get confused, and remember, practice makes perfect.
Discussion | Share Feedback
You must be logged in to post a comment.